DIY Wooden garden fence – picket palisade instructions and designs

Give your garden a fabulous look by building a beautiful wooden garden fence by yourself. Our proposal takes into account the classic picket palisade, which would make every home warm and inviting. You can then paint the garden palisade, add decoration and other highlights such as flower baskets and climbing plants.

The materials list below describes a 1, 22-foot railing and a wooden post. The letters correspond to the following instructions and plans. An asterisk * indicates the length used on the site.

Materials
A) 1 wooden posts: 14 x 14 x 100 cm
B) 1 cap: 3 x 19 x 19 cm
C) 1 cap: 2 x 14 x 14 cm
D) 4 cubes: 2 x 2 x 2 cm
E) 2 rectangles: 2 x 2 x 5 cm
F) 1 triangle: 2 x 6.4 x 14 cm
G) 2 wooden posts ornaments: 2 x 9 x 15 cm
H) 4 trims: 2 x 2 cm
I) 1 upper crossbar: 4x * 9 cm
J) 1 low crossbar: 4 x 9 cm *
K) 1 support: 2 x 5 cm *
L) 8 battens: 2 x 9 x 87 cm
No. 3, No. 6 and No. 8 galvanized finishing nails
4-inch galvanized deck screws
8 x 2 inch angle iron rust resistant

Tools:
tape measure
pencil
levelling
circular saw
jigsaw
cutter with carbide cutter bits
drill
Phillips-head bit
hammer
nail set

1 In order to build a palisade post for wooden fence (A), cut a wooden post in 14 x 14 to 100 cm. Make 1 cm chamfer on each corner. Using a 5 x 20 square (B) and a 3 x 15 cm, make a cap (C). Cut cube (D), rectangles (E), and triangle (F). To form more ornaments for the wooden posts, cut a piece of wood 3 x 10cm (G) and add trim (H).
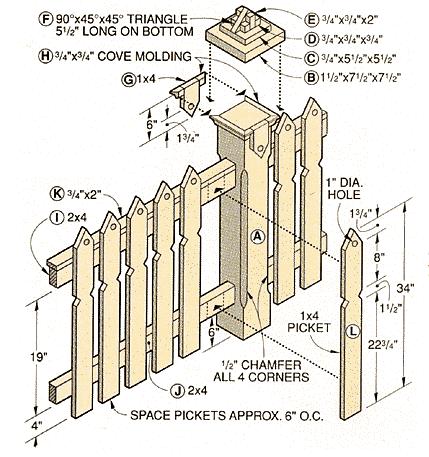
2. To build the railing, cut two 5 × 10 cm long wooden planks to form the upper (I) and lower crossbars (J). Press and hold the crossbars (I, J) parallel to each other; Use a pencil to mark the position of the fence slats (L) mark. Attach a small bar 3 x 10⁻⁵ cm, to form additional support (K). Fix the battens on the crossbars at intervals up to 6cm (J) with two screws at the top and bottom.

3. Using a saw and sandpaper, you can, of course make the wooden slats in the desired form. Here the slats have only one hole at the top.
4. Assemble all together. The posts are placed in the drive-in sleeves and fixed with machine screws. It is important to check that the fence posts are straight, so that the wooden palisade does not bend. Attach the preassembled elements on the wooden post.